
Sometimes spicing up your Blogger posts with image manipulation can be a good thing. Images are a core part of the blogging experience and having some simple tools can make a bland post look great. I wanted to quickly show how you can add a simple near-transparent background to a single Blogger post.
 Adding a background image is really quite simple. Some have tried using many of the CSS transparency tricks to do this but that typically runs into problems with different browsers and versions. The best way is to just find an image, scale it to the right size and then lighten it up for the illusion of a transparency.
Ok, I happened to stumble into a free online tool called LunaPic that allows you to either capture an image online or upload an image while giving you basic image editing features. You could certainly use another, more sophisticated tool but I thought this gives the basic user the functions needed.
There are really only two things you'll want to do with your image editing tool - scale the image down to close to your blog post window size and lighten or brighten the image so it looks washed out - or, gives it a transparency feel.
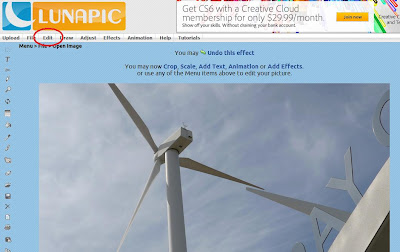
So, I'll first apologize for the LunaPic interface - it really is pretty bad. However, I'm going to add a background to this post for the example. First, go to the free LunaPic Editor. Here's the main screen - choose the 'Browse...' button to find an image from your disk:

I've chosen a 3MB image from my digital camera. Once you pick the image you'll need to select the 'Upload Now!' button and it should show up on the LunaPic screen like this:
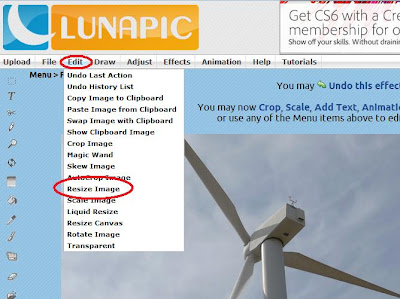
You can see that I circled the 'Edit' menu item above. Choose the 'Resize Image' option if your image is really large. In my cse this image is 4000x3000 pixels - much too large:
I decided to scale the image down to 700x525 just so I don't use a bunch of Google storage but also to fit on the post a bit better. Be sure to keep your aspect ratio right. In my case my original was 4 by 3. So, if I set the width to 700 then multiply by 3/4 to get the height. Otherwise just eyeball it. Enter the values and press the 'Resize Image' button like this:

Next step is to lighten up the image as much as you can so that it looks very transparent. Hover over the 'Adjust' menu item and select 'Brightness' like this:

You'll want to make the image fairly light so that your text doesn't get muddled in the image when you post. Use the slider bar to the right to lighten it. Once set, select the 'Set Brightness' button to save your change. Once done you can now save your image back to your computer by scrolling down to the bottom of it like this:

Note that you can also Undo any changes in your history as well. Go ahead and save the image back under a new name by selecting the 'Save To: Your Computer' option. You're now ready to add the image to your post.

Simply select the image you just saved from LunaPic using the image 'Browse' button and uploading it like so:

Once you've uploaded the image, Blogger will have the URL of it buried within your HTML of the post. You're going to want to copy the URL location of that image. You'll want to first find that URL within your post so you can copy it for later. Since you just added it - it should be at the very end of the HTML like this:

You can see that I added my LunaPic image to this very post in the HTML. I've shown you what specifically to copy to use later as the backgroud. Be sure to copy it now and paste it into a word processor or notepad. Once copied, go ahead and go back to the 'Compose' view of your post and delete the image from within the post itself that you just added. Don't worry! It is still out on Blogger's storage.
Now that you have your image uploaded you'll need to add this div tag to the second line of your blog posting's HTML. Note that I added some padding so that your text is slightly indented from the image:
Be sure to add a </div> end tag to the very bottom of your full post in the HTML to have the tags balance:
Once you've done that be sure Blogger isn't complaining about your tags and take a look with the 'Preview' button to see if all looks good.
That's it! You're done. A couple of notes to point out. First, the background image will not span through the title of the post and may have a margin depending on your template. You could try to add this deep within the template itself and create so type of CSS style tag to flag certain posts. This would be very difficult.
Enjoy!
Free Online Image Tool
 Adding a background image is really quite simple. Some have tried using many of the CSS transparency tricks to do this but that typically runs into problems with different browsers and versions. The best way is to just find an image, scale it to the right size and then lighten it up for the illusion of a transparency.
Ok, I happened to stumble into a free online tool called LunaPic that allows you to either capture an image online or upload an image while giving you basic image editing features. You could certainly use another, more sophisticated tool but I thought this gives the basic user the functions needed.
There are really only two things you'll want to do with your image editing tool - scale the image down to close to your blog post window size and lighten or brighten the image so it looks washed out - or, gives it a transparency feel.
So, I'll first apologize for the LunaPic interface - it really is pretty bad. However, I'm going to add a background to this post for the example. First, go to the free LunaPic Editor. Here's the main screen - choose the 'Browse...' button to find an image from your disk:

I've chosen a 3MB image from my digital camera. Once you pick the image you'll need to select the 'Upload Now!' button and it should show up on the LunaPic screen like this:

You can see that I circled the 'Edit' menu item above. Choose the 'Resize Image' option if your image is really large. In my cse this image is 4000x3000 pixels - much too large:

I decided to scale the image down to 700x525 just so I don't use a bunch of Google storage but also to fit on the post a bit better. Be sure to keep your aspect ratio right. In my case my original was 4 by 3. So, if I set the width to 700 then multiply by 3/4 to get the height. Otherwise just eyeball it. Enter the values and press the 'Resize Image' button like this:

Next step is to lighten up the image as much as you can so that it looks very transparent. Hover over the 'Adjust' menu item and select 'Brightness' like this:

You'll want to make the image fairly light so that your text doesn't get muddled in the image when you post. Use the slider bar to the right to lighten it. Once set, select the 'Set Brightness' button to save your change. Once done you can now save your image back to your computer by scrolling down to the bottom of it like this:

Note that you can also Undo any changes in your history as well. Go ahead and save the image back under a new name by selecting the 'Save To: Your Computer' option. You're now ready to add the image to your post.
Adding an Image Background to a Blogger Post
The next trick is to upload your modified image to Blogger so that it is saved for the background. Google will keep the image in storage so don't worry about losing it. You'll just want to upload the image directly to your post using the Blogger post editor Image button:
Simply select the image you just saved from LunaPic using the image 'Browse' button and uploading it like so:

Once you've uploaded the image, Blogger will have the URL of it buried within your HTML of the post. You're going to want to copy the URL location of that image. You'll want to first find that URL within your post so you can copy it for later. Since you just added it - it should be at the very end of the HTML like this:

You can see that I added my LunaPic image to this very post in the HTML. I've shown you what specifically to copy to use later as the backgroud. Be sure to copy it now and paste it into a word processor or notepad. Once copied, go ahead and go back to the 'Compose' view of your post and delete the image from within the post itself that you just added. Don't worry! It is still out on Blogger's storage.
Now that you have your image uploaded you'll need to add this div tag to the second line of your blog posting's HTML. Note that I added some padding so that your text is slightly indented from the image:
<div style="background: url("your-full-blogger-image-url-here.jpg"); padding: 5px;">Copy this line and paste it just after the post's first <div> tag that should look pretty close to this when viewing your post in the editor. Select the 'HTML' button in the upper left and add your line. Be sure to replace 'your-full-blogger-image-url-here' with the URL you copied earlier:
<div dir="ltr" style="text-align: left;" trbidi="on"> <div style="background: url("your-full-blogger-image-url-here.jpg"); padding: 5px;"> Your blog's Post text here....
Be sure to add a </div> end tag to the very bottom of your full post in the HTML to have the tags balance:
</div>
Once you've done that be sure Blogger isn't complaining about your tags and take a look with the 'Preview' button to see if all looks good.
That's it! You're done. A couple of notes to point out. First, the background image will not span through the title of the post and may have a margin depending on your template. You could try to add this deep within the template itself and create so type of CSS style tag to flag certain posts. This would be very difficult.
Enjoy!
Excellent tutorial as usual Don. Might try this trick soon. I could see it being useful for a special post.
ReplyDeleteI followed the instructions above and still do not get an image under my blog posts.
ReplyDeleteHey Bright....um...or, Squirrelly.
DeleteI see your test post on your blog and an image behind it. Is it working the way you want now?
Thanks!
- Don
thanks very much for this! helped me understand quickly and thats what im about! :D
ReplyDeleteThanx for the tutorial.This tips is very important for newbie. I bookmark your post for future access.
ReplyDeleteThanks. This works great, but when I add my nearly "transparent" image, it comes in dark gray in my post, as if that's a set background to any image I upload. In other words, if I set brightness so it's completely transparent, when I import the image in blogger there's a gray box, not a white box. Cheers,
ReplyDeleteYou are the best; thanks a lot for the information
ReplyDeletethanxxxxxx brooo
ReplyDelete2020 haha 😆 I followed the steps but a little confused. Doesn’t work
ReplyDeleteMaybe they changed everything so we can’t have fun anymore
Still worked for me on both the old and new templates. Try it again with a test blog.
DeleteGreat and informative post, thank you!
ReplyDelete