Showing posts with label Blogger Customization. Show all posts

Build a Programming Blog on Blogger - Part 2

by
Ok, in Part 1 I modified the Blogger Contempo default template into a very clean, responsive programming blog. I also pointed out some of the Google Blogger template structures--so if you've forgotten, just go back a take a look at the brief description. We'll be focusing on some of the code within the template this time. (If you're just too anxious to see the final result just click on this image:)

https://codingcontempo.blogspot.com/


One quick fix that I forgot in Part 1 was to modify the blog topic labels to be more visible. Just go back into the main menu and select 'Theme/Customize' again to go into the Blogger Theme Designer. Select 'Advanced / Labels' and set the 'Label background color' to blue like this:

Altering the color of Blogger labels in the theme designer

Press the 'Apply to Blog' button and take a look at one of your posts - you should see your labels in your posts (Note: if you didn't add labels to posts originally, go into each post and on the far right side of the post editor you'll see 'Labels' - just add subject labels there and save the post - your labels will appear in the blog post now) :

Changing the color of the Blogger labels in a programming blog
Your colorized labels also show up in the left sidebar of the blog as well.

Build a Coding Blog on Blogger - Part 1

by
In the last decade being or becoming a programmer or coder has become a path to one of the hottest job markets in the US and probably in the world. Coders are in very high demand and keeping up on new technology can be a challenge. Many coders learn not only through classes or jobs, but also through coding blogs.

Unfortunately Google seems to have missed the mark completely by bypassing Blogger as an amazing platform for technologists and coders. I should note, though, that it really isn't the platform that is the problem--it is the available templates and API integrations offered by Google. Yes, you can go out and find Blogger templates from third parties, but, if you (Google) haven't offered a set of clean coder templates along with Github integration you've clearly missed a significant opportunity.

That being said a clever programmer could certainly go out to the Blogger API to integrate posts into Github and attempting to hack template uploads as part of a continuous integration build. But, that's beyond the scope of this post. The goal today is to guide you, the coder, to a simple, clean, customized, extendable and reactive template that looks and feels like many of the blogs or articles you see on sites like Hackernoon or others.

Let's get started.

Choosing the Blogger Template

First step is to choose the right base Blogger template. Clearly, we only have four choices since we want a modern, reactive template (Contempo, Soho, Emporio, or Notable). Each has it's pluses and minuses but I'm going to use the Contempo template since it has a nice full-screen feel and is somewhat minimized.

Customize Social Share Icons in Blogger

by
Standard set of social sharing icons for popular social web sites
I've been spending a significant amount of time this year digging deep into the new Blogger responsive templates (Contempo, Soho, Emporio and Notable). There's quite a bit to be excited about yet there are some very frustrating components to the new responsive layouts that bother me. I will be posting more about them soon.

In the mean time I thought I would add a short post on how you can alter the social share icons in these four responsive templates (plus a similar change in the older V2 template icons at the end of this post). One of my frustrations with the new templates was that all of the social share buttons were set to the same color. You can alter their foreground and background colors as a group in the Template Theme designer which is good, but, they're all the same and don't match the standard colors of the social network logos. It seems that all four templates have used the same social sharing svg icon code.

SVG Icons

If you're not familiar with svg icons you can find more information here (SVG 101) and here (What is SVG?). When the new Blogger version 1.3 or V3 templates came out in early 2017, a significant amount of code was added dynamically as your blog renders for responsive images and SVG sprites. (If you want to find out your Blogger template version just look in the Template html - you'll see the version at the top. Most of us have been using version 2 for the last 10 years).

Using Bootstrap with Blogger Templates

by
Bootstrap logo
Well, some of you may have been waiting for my second part of the Wordpress vs Blogger review. But, I was sidetracked by a much more ambitious project - merging the dynamic Bootstrap web framework with Blogger. I knew initially that this would be quite a challenge to get it right - and was I correct in that assumption. Note: since this was written I was able to successfully replace this tutorial's Bootstrap 3 code with the Bootstrap 4 and new JQuery libraries. The newer Bootstrap CSS code has not yet been tested. More to come...

So just what is Bootstrap? You can go over to their site and read up, but, at a very high level it is designed as a starter kit for dynamic web UI layouts that utilize CSS and Javascript for a great user experience. If you've seen sites like this one, or this other one - you'll see how Bootstrap can be beautifully extended. In the case of Blogger almost all of their templates are very static and were designed in the 2005-2010 time frame. In the last few years the web has exploded with new, dynamic web frameworks that have reactive interactivity without page refreshes.

The easy path to my task would have been to strip out the entire Blogger template and add Bootstrap in its place as some of these template providers have done. But, if you read my Best Blogger Templates article you know that I am a stickler for keeping Google Blogger as pure to its original intent of a dynamic layout and user substitution of design elements vs a copy-paste of some Wordpress or other template like Bootstrap and just getting it to work.

Blogger vs Wordpress

by
With the large number of free blogging sites out there, two still remain at the top for informational blogging - Blogger and Wordpress. Yes, there are other free blogging sites such as Tumblr, Weebly and Wix - but, they are not really my focus (other than Tumblr which I use for more visual blogging than informational blogging).

Invariably, however, someone will always ask me what's better - Blogger or Wordpress?  By Wordpress here I mean the free online version at Wordpress.com and not the software you download from Wordpress.org and manage yourself on external hosting platforms such as Bluehost (that would be like comparing apples to oranges - running Wordpress on a custom host is really more like building your own website except with a content tool installed). Of course, 'better' is a relative term depending on what you want to do with the tool. Given that, though, let's take a deeper look at both.

Search Engine Optimization - SEO

First, I have to call out immediately that within the last 1 to 3 years you get no advantage for SEO utilizing either tool. Google has completely changed its strategy so that internal formatting such as tagging, long-tail keywords and metadata within the HTML is not nearly as important as the authoritative content you write and highlight. You can build rank directly with content, so, I'm not going to dig deep into the template structures other than to reinforce that content rules today. (For more information  I agree with this SEO article generally but not as much with the keyword sections). This is an even tie for both tools.

Best Blogger Templates - 2014

by
So, this might be one of the most difficult posts that I have written on BloggerTipsPro.com. I have to start off by first apologizing to the creative authors out there that have produced some amazingly beautiful Blogger templates for the world to use. That said, I have some unfortunate comments to make to my readers that may or may not persuade you to use what Google provides out of the box or just to go get one of these templates.

Here it goes - I have spent many, many hours and days trying to find any template out there that qualifies as a 'best Blogger template' and found nothing - absolutely nothing. I've gone through hundreds of websites all pitching either free or paid Blogger templates and not a single one has made the grade of what a Blogger template should be. People have pitched their templates directly to me to add to this site but still did not qualify in my mind.

Blogger Templates are not Wordpress Templates

The problem - web designers totally understand page layout and design - however, they do not understand Blogger templates. Part of that must be blamed on Google for not adequately explaining the technical aspects of the template.

Adding Related Posts to Blogger Blogs

by
Adding related links within Blogger
NOTE: LinkWithin no longer exists. This post will not work any more.

There has been a change in Blogger and LinkWithin. A number of users have found that LinkWithin is not working for them. Be aware you might find some issues. If you find you are having the issue, select Other for your Platform and manually add the script to a HTML Widget. You've probably seen a number of blogs that have related internal blog posts tagged at the end with inter-linking across the site. It's a very nice feature that has been made even easier by a online utility called LinkWithin.com.

The steps to adding this feature are so simple that it only takes a few minutes to get a great looking extra look-and-feel without much effort. Start by navigating to LinkWithin.com. Right away you'll see the starting point by entering your information into the widget form on the main page like this:

How to add related posts within Blogger

How to Create a Favicon for Blogger

by
Google search icon for favicon
Copyright 2012, Google, Inc.
Have you ever asked 'what is that little icon in the address bar?' or 'what is the little image next to the url called?' I would hazard to guess that asking someone who has worked online probably never bothered to learn what the word 'favicon' means (though, guessing that it meant 'favorite icon' wouldn't be too tough to figure out). First released in 1999 in Internet Explorer 5, the World Wide Web Consortium adopted it soon after.

Creating favicons for Blogger is pretty easy these days and can be done in literally minutes. The hard part is trying to map your logo or symbol into such small dimensions. And, to add to that, the expansion of icons of larger sizes has exploded over the last few years with mobility and the evolution of browsers.

Overall, however, it is a simple task at hand with only the need of a paint program (with a supplement - possibly) and a great online tool called Iconifier. These will allow you to create favicons and icons for almost all browsers and devices. If you're really interested in the history and aspects of the favicon you can jump over to Jonathan T. Neal's very comprehensive article called Understand the Favicon.

Here we'll just be concerned for favicons for Blogger. I'll walk you through some of the key considerations when designing your own with an emphasis on using simplicity as your guide (more creative folks who have deeper digital artistic skills can go much deeper).

How to Make Category Tabs in Blogger

by
blogger tab menuNOTE (March 2014): Blogger has moved the function to set the category URL from the Pages section below to the Pages Gadget. You don't add category links in the Page but add them in the Gadget - this will be updated soon. It was a great addition to Blogger when they added the tab menus as a feature. However, many times I've heard people asking how they can alter their menu tabs to be Blogger categories instead of Pages. Good news is that this is a very simple thing to do and only requires a few steps.

What you may not have realized is that in the Blogger Pages menu item is the ability to link to a URL instead of a Blogger Page and that Blogger categories (or labels) are just that - blogger URLs.

Getting the Category URLs

First thing you want to do is to make sure each of your posts have labels defined. If you want your posts to be seen in only one category then you can only give each post a single label. Next stepis to find the URL of one of your Blogger categories by clicking on the category directly like this:

blogger category labels

Best Blogger Showcase

by
Blogger logoTime to highlight some of my Blogger Tips Pro reader's blogs that I've taken a look at and have found to be both great uses of Blogger that are also using some of the techniques highlighted. These bloggers haven't asked me specifically to showcase or critique their blogs. Nevertheless, every time someone posts a comment anywhere on Blogger Tips Pro, I take a look at their profile and blog link to see what kind of blog they've created. Sometimes my own inspiration comes from scanning through other's blogs.

My Blogger Showcase

Here are three that I've found to be great Blogger examples (in no specific order)

Blogger template for Oahu Scuba Diving


Oahu Scuba Diving  - this is a great use of Blogger to highlight a business. Many of the elements presented here are incorporated into an intriguing combination that easily shows the right information, focused photo usage and customization of the standard, out-of-the-box 'Picture Window' Blogger template! 

Hide the Blogger Sidebar - Quick Tip

by
Hide the Blogger Sidebar on a Static Page
Many times when you want a static home page you don't want to see the sidebar widgets. You probably noticed that on my test site for the Static Home Page I was able to hide the sidebar that you normally see on you layout in the blog posting page. Removing this is a simple trick and just requires some basic CSS and Blogger template code to adjust. The key to doing this is to simply use CSS to hide, or, display:none on your sidebars and then adjust the width of your page to fit your design needs.

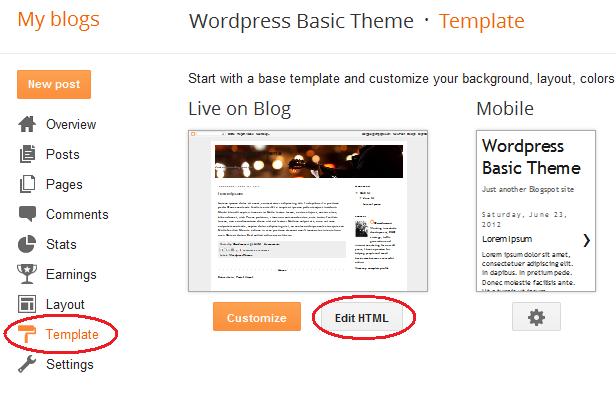
First step is to just into your Blogger template editor and then choose the 'Edit HTML' button like this:

Edit the HTML of your Blogger template
Click the 'Proceed' button to jump into your template. You don't have to worry about 'Expand Widget Templates' here because we're only working within the CSS section. Seach for the part of your template that has the keyword ]]></b:skin> like this:


You can see the section I've highlighted in my circled region - plus, I've shown about how far down in the template you need to go to find it.

Add a Slider to Blogger

by
APRIL 2013 UPDATE!! Serveral readers have discovered that part of this tutorial does not work for domains other than the standard Blogspot.com domains. There is a fix here, however!! If you have a custom domain you will need to follow this tutorial - but also the section called 'Addendum 1' at the bottom of this post in order for the slider to work correctly.

Life can get pretty darn busy at this time of year. I had to take some time off posting just to get my grad school work done as well as my job. There's a ton of new tutorials I have in my back pocket but just haven't had time yet to do the work. But, my paper is done for school and I'm now relaxing in a snow storming weekend.

What I didn't expect was that I would be spending hours trying to find a good image slider for Blogger that didn't run into weird problems or wasn't too complex to implement. Image sliders are very cool but are implemented in so many different ways - typically in Flash or Javascript. In this case I had to work through about four different free sliders to find one I liked or that worked right. Blogger does have a Slideshow gadget, but it doesn't have any real customizable features.

Let's get started. The Image Slider template I chose is from a company called Menucool.com and offers a free slider framework. You can view a sample of it in action by clicking on the image in the upper left of this post. The part that sold me on it was the fact that it didn't require JQuery script code in order for it to be implemented. That's good for us because it reduces the load time for your blog and is easier to install (note that easier is relative here - it is still a bit of a trick to get it setup correctly).

Uploading and Installing the Main Script

The main Javascript code for Menucool requires you to install some javascript code somewhere. Well, as you know Blogger doesn't have a place to install a file. You could extract the script and embed it into your template. But, I like to add it to Google Sites as a file then reference it. Your first step is to go to the Menucool.com Javascript Slider page. From there scroll down a bit to download the image slider code. All we want right now is the main Javascript file - click on the Download button:

Menucool javascript for Blogger image slider

Add a Background to a Blogger Post

by
Sometimes spicing up your Blogger posts with image manipulation can be a good thing. Images are a core part of the blogging experience and having some simple tools can make a bland post look great. I wanted to quickly show how you can add a simple near-transparent background to a single Blogger post.

Free Online Image Tool

Adding a background image is really quite simple. Some have tried using many of the CSS transparency tricks to do this but that typically runs into problems with different browsers and versions. The best way is to just find an image, scale it to the right size and then lighten it up for the illusion of a transparency.

Ok, I happened to stumble into a free online tool called LunaPic that allows you to either capture an image online or upload an image while giving you basic image editing features. You could certainly use another, more sophisticated tool but I thought this gives the basic user the functions needed.

There are really only two things you'll want to do with your image editing tool - scale the image down to close to your blog post window size and lighten or brighten the image so it looks washed out - or, gives it a transparency feel.

So, I'll first apologize for the LunaPic interface - it really is pretty bad. However, I'm going to add a background to this post for the example. First, go to the free LunaPic Editor. Here's the main screen - choose the 'Browse...' button to find an image from your disk:

Edit Images for Blogger Posts

Add Pinterest Button to Blogger Posts

by
Pinterest logoNov/Dec - 2012: The Pinterest button is acting up again. If you have trouble there is a code fix now within this post - you might find some issues since the Pinterest code doesn't work well.
As you probably know, Pinterest is sweeping the world right now as yet another social networking site. It's novel approach allowing users to share interests by 'pinning' images onto grouped boards seems to have captured people's attention.

You may have noticed that I've added the Pinterest button to my posts. For this site, Pinterest probably doesn't apply very well since it is focused on 'how to' content rather than more design, or image-centric activities (feel free to Pin-it anyway, if you'd like!). But, if your site is focused on hobbies, travel, photography, design, etc., then Pinterest is the social site you should be connecting to.

Adding a Pinterest button to your Blogger posts is relatively simple - however, it is a direct template customization that could cause you some issues. As always be sure to backup your template before making these changes (check out my post if you don't remember how - How to Backup Your Blogger Template).

Oddly, the Pinterest Goodies section that allows you to create buttons is very static for sites. They have you enter your site and image URLs directly to make a button. This might be fine for a static page or site, but as bloggers we want each post to be linkable to Pinterest.

Fortunately, some creative souls out there were able to modify the Pinterest scripts in a way that allows the buttons to be connected to each post. In this example I wanted the button to fit with the standard, out-of-the-box Blogger social media buttons at the bottom of each post. (My guess is that Google will add a Pinterest button within a year or two so this tutorial will just be a bridge for now.)

Adding the Pinterest Pin it Button to Your Posts

The first step is to jump to the Blogger Main Menu for your blog and choose the 'Template' and 'Edit HTML' option:


Blogger Static Home Page - Google Search Results

by
I thought I would add a quick update on how Google indexed my Blogger static home page. One of my main concerns was that Google might not like the Blogger page redirect in the search results. Frankly, it was difficult to tell just what kind of redirect Google was using.

First, take a look at the search results. This static home page blog is already indexed by Google and looks to have been successfully indexed:

Blogger static home page indexed in Google
Note that the URL does not show the final redirected URL of http://statichomepage.blogspot.com/p/home-page.html - which is a good thing.

Now, taking a look at the actual page HTTP response you can see that Google does a 302 temporary page redirect for the static home page:


From what I could see on the Google help pages and forums, this looks good for Blogger static home pages. Take a look at this response from a Google representative on 302 redirect behavior.

To quote the representative from Google, "Generally speaking, with a 302 redirect we'd try to take the content of the redirect target (in your case PAGE-B) and index it under the redirecting URL (in your case PAGE-A). If the target has a noindex meta tag, then it's likely that we'd apply that to the redirecting URL as well."

Wordpress Theme for Blogger - Part 3 (Final)

by
The last steps in building the Wordpress theme are mostly minor tweaks. There will be some template CSS changes, but, these will be some simple steps. What you see at the left is my completed Tw***yTe* theme for Blogger. If you click on the picture you'll see the template in action!

One thing to note - I cannot give this template away since Simple is copyrighted by Blogger and the artist who created it. You'll have to do the modifications yourself as noted in Part 1 and Part 2. If you're in the market to create Blogger templates then don't use an existing copyrighted one to sell online. You'll have to start from scratch or buy a template. However, you can always try to contact a template owner to see if they'll allow you to customize and resell an existing one.

Adding the Blogger Tab Menu

Ok, the next step is to enable the Blogger tabs just under the banner we added. The good news is that these will automatically be enabled in the right position for the Wordpress theme look-and-feel.

Go back into the Blogger main menu and choose 'Pages' to turn on the page tabs on the site. Just pick the dropdown called 'Show pages as' to select 'Top tabs' like this:

Blogger page tabs
This will turn on the Pages tabs at the bottom of the banner image. Let's add another page to make sure the tab menu works well. Choose the 'New page' dropdown and select 'Blank page':

Build a Basic Wordpress Theme for Blogger - Part 2

by
After completing Part 1 of this tutorial, I see that this part is going to be the trickiest such that I think I'll just focus this post on adding the top image and repositioning the title and description. As much as I wanted to not touch the template directly, I discovered that we're going to have to make one change deep within the Blogger Simple template.

Before we start be sure to either practice these changes in a test blog or backup your template before starting. This is critical!! Be sure to read my post How to Backup Your Blogger Template to learn how to do this.

Adding a Banner Image to the Wordpress Theme

Ok, from Part 1 we were ready to add the banner across the top of the template. I'm not going to go into a deep tutorial on how to create and format a banner image other than to say you need a .jpg (JPEG) or .png (Portable Network Graphic) image that is formatted to approximately 940x165 pixels ready to go. If you don't know how to do this check out the video tutorial called How to Make Blog Headers, or, just do a search for creating a Blogger or Wordpress header image in Google.

To add a banner in Blogger is simple - just access your template's layout using the main menu 'Layout' selection and press the 'Edit' link in the 'Header' section like this:

Blogger banner edit


Build a Basic Wordpress Theme in Blogger - Part 1

by
Wordpress sample theme
Everyone loves Wordpress themes - am I right? Well, before we get started I'm going to tell you a story about my first attempt at building a Wordpress theme in Blogger before Google came along a auto-deleted my work. Auto-deleted??

The goal of this tutorial is to build and modify an existing standard Blogger layout to look just like the Wordpress Tw****Te* theme. (The reason I did not actually add the words here is because Google thinks that particular keyword is somehow asscociated with spam). I started this mini project by naming my Blogger blogspot example tw****te*.blogspot.com. As I started working with it I suddenly received an error. Looking back at my blog listings, that particular one had been deleted by Google!!

I'm not sure of the rationale here but I'm guessing that Google feels that name is a means to drive a spam site. I wasn't too far into it yet so it really wasn't much of a loss - but I must admit I was a bit shock by the sheer bravado of Google to assume that I was spamming the system. So, it this tutorial I"ll be using more, 'a-hem', generic words. You'll know what I mean when you see the actual template in action.

Basic Theme Configuration in Blogger

Starting from scratch, the easiest way to build this theme is to start with Blogger's 'Simple' template. Here's the visual of my first step - just highlight the theme in the Template window:

Creating a theme from the Simple Blogger template

This template works well for a look-a-like Wordpress theme since it is easy to manipulate. However, it does have a few quirks that force you to use some simple, custom CSS code. I'll get to that later.

Creating a Blogger Static Home Page

by
Seems like there's always an unusual case where you want to create a Blogger blog with a static home page instead of the reverse order blog posts instead. I see this question quite often in the forums and support pages of other sites. Though this isn't a typical configuration for Blogger, the recent changes in the new layout editor have made this easier than ever without having to spend time editing the template code as you had in the past.

Add the Static Home Page

The first step is to simply create a static page in Blogger called something like 'Home Page' from the Blogger Pages menu item. Don't call it 'Home' yet because we're going to alter the home link later. When you click on the 'Pages' left menu item in the Blogger editor main menu you'll see that there is already a 'Home' link on the screen. Ignore that for now--just go up to the 'New Page' drop down box and select the 'Blank page' option:

Blogger static pages


Add a Wordpress Spyglass Search Bar to Blogger

by
Though Blogger provides a very good standard Google search widget for you blog, wouldn't you like it to look and feel a bit more modern much like a Wordpress site? Well, given that you may want to spice your blog up a bit, I've provided a simple search form that gives you some style.

Under the hood, the Google search widget really just calls an interface that does the searching for you. Using some basic HTML, you can call this same interface with a custom form. The difference between a Google widget and the custom one is that you need to get an image uploaded, create an HTML form, and add some custom stylesheet code.

Though the Google widget is a bit more diverse for searching both internally on your site and externally, I still like the search eyeglass view.

Upload a Search Icon


First step is to get a magnifying glass image uploaded to your blogger site. The trick is to either add the image to a post or sidebar, copy the URL that blogger used to store it, then use a style command to hide the image (if you want to hide it).

You can use the one I've added to this post if you wish. Just right click on the image and choose 'Save Picture As...' to save it on your local hard drive:


If you take a moment to look at this specific URL of this image by right-clicking on it and selecting Properties......you'll see a very long Blogger URL such as


What you'll want to do is either add this image to a Post or in the Sidebar to get it uploaded to Google. You don't have to worry about using the image from an external site. Once uploaded you can then copy its full URL as the search box image background. Be sure you use the image setting of 'Original Size'.  Just remember to get the image uploaded to your site.

Add the Search CSS Code